Conversational Forms
In this section
Conversational forms are an essential Algho tool for profiling a specific user request in detail.
For the company, they are a lead generation tool useful for collecting information about the person or company interacting with the assistant. For the user, they are a necessary tool for submitting a request and obtaining a specific service.
When designing a form, you write a series of questions that the assistant will ask the user. Depending on the answers provided, the conversation will unfold along vertical communication flows dedicated to a specific topic.
To successfully complete the form, the user must answer all the questions asked.
In short, it means creating and filling out a form digitally, by talking with an assistant that can explain to the user why that data is needed, what it is used for and how it should be provided.
All options involving the use of AI Gen are only available for accounts with this feature enabled.
Accessing Forms
The forms section is located in the main menu in the left column:
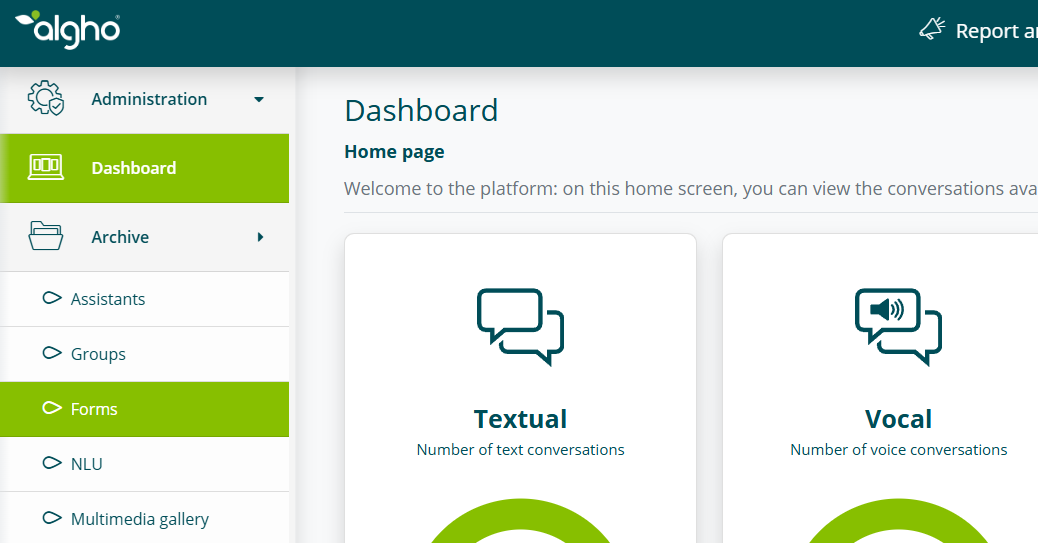
Once the Forms item is selected, click the Add button to create a new form:
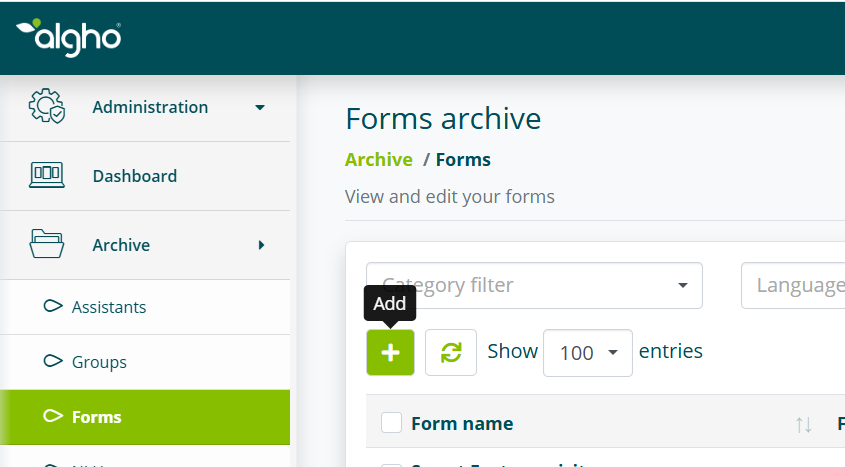
The first screen then opens, with all the settings to configure for the form's preliminary options.
General Form Settings
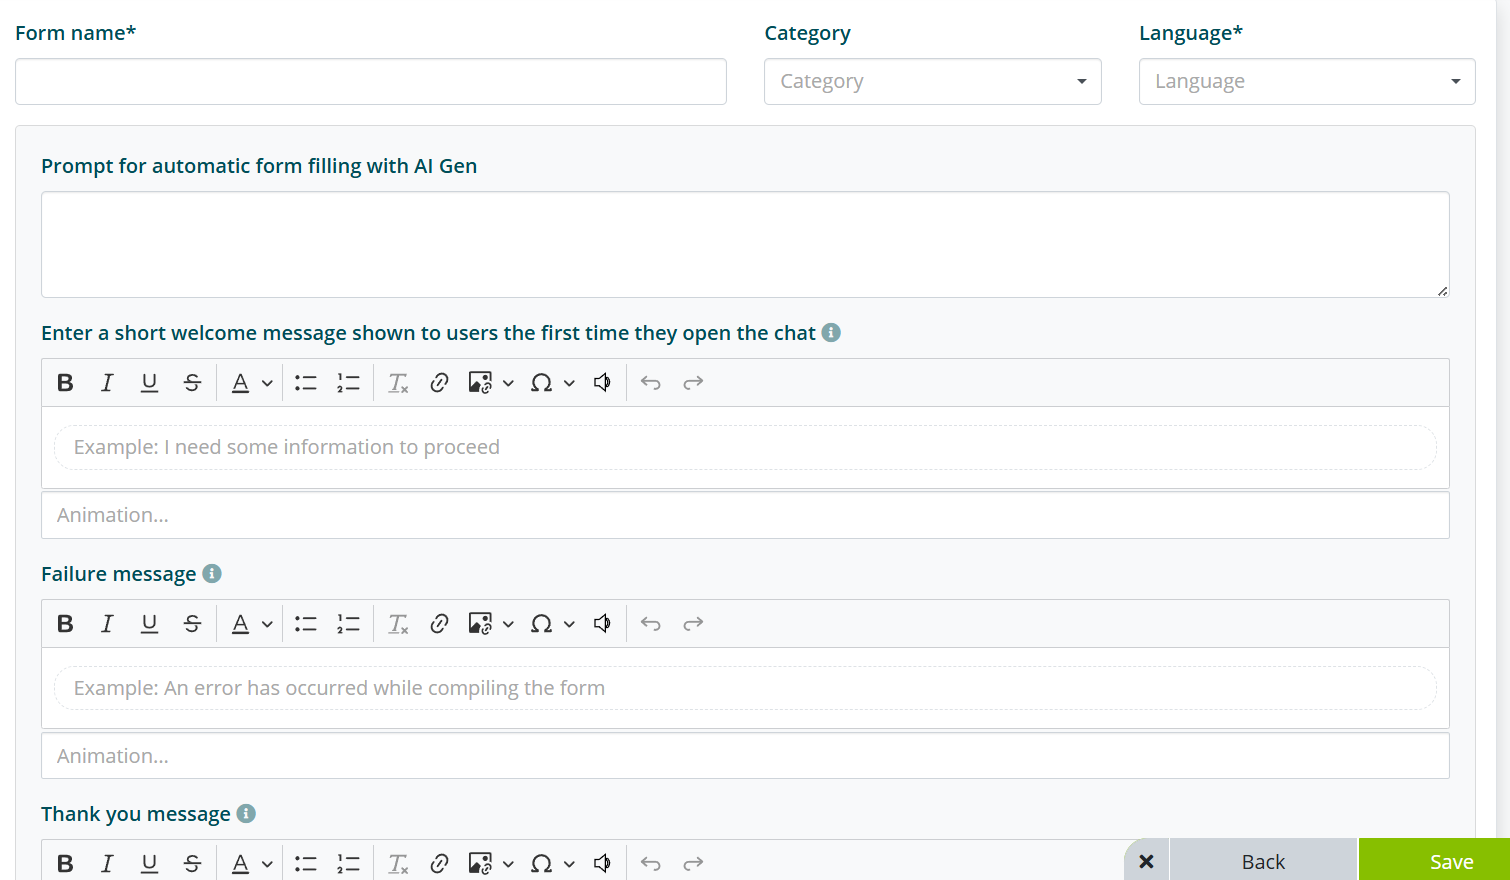
The form creation screen contains all the preliminary options to configure. Fields marked with an asterisk (*) are required.
Basic settings
| Field | Description |
|---|---|
| Form name | The name that identifies the purpose of the form being built. It is important that the name is descriptive, so that it can be recognized among all the others. |
| Category | Assigning a category can be useful for additional filtering. |
| Language | You can select from 8 different languages. |
| Prompt for automatic form filling with AI GEN | To enable the use of AI Gen on the form, write in this section a preliminary prompt explaining what data will be asked of the user and the purpose of the whole form (see AI Gen in Forms). |
| Welcome message | A sentence the assistant will say. It is usually a short sentence explaining to the user why answering the questions is mandatory and what type of data is required. This message is triggered right after the answer of the intent the form is attached to. |
| Failure message | For each field you can manually set a number of attempts after which the form stops automatically. The failure message, even if not customized, is still triggered with a preset sentence. |
| Thank you message | The final message that closes the form after the user has answered all the questions. There is no default message. |
Consent and manual interruption
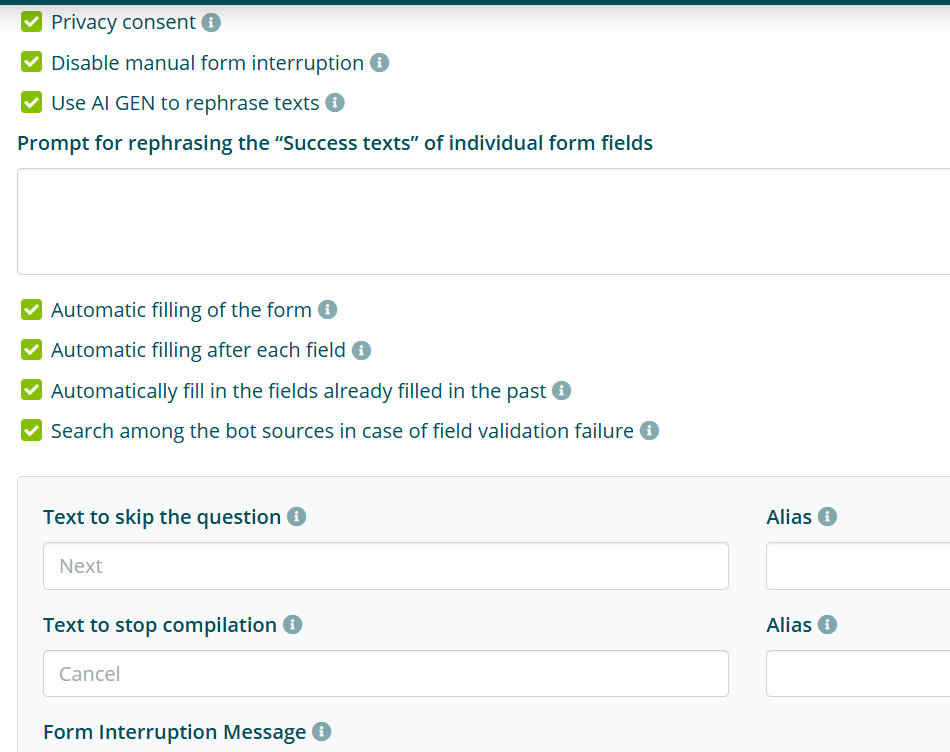
- Privacy consent: when sensitive data is requested, enabling this option lets you choose which consents to activate (marketing, disclosure of data to third parties, newsletter consent, events and webinars). The user will be the one to select them.
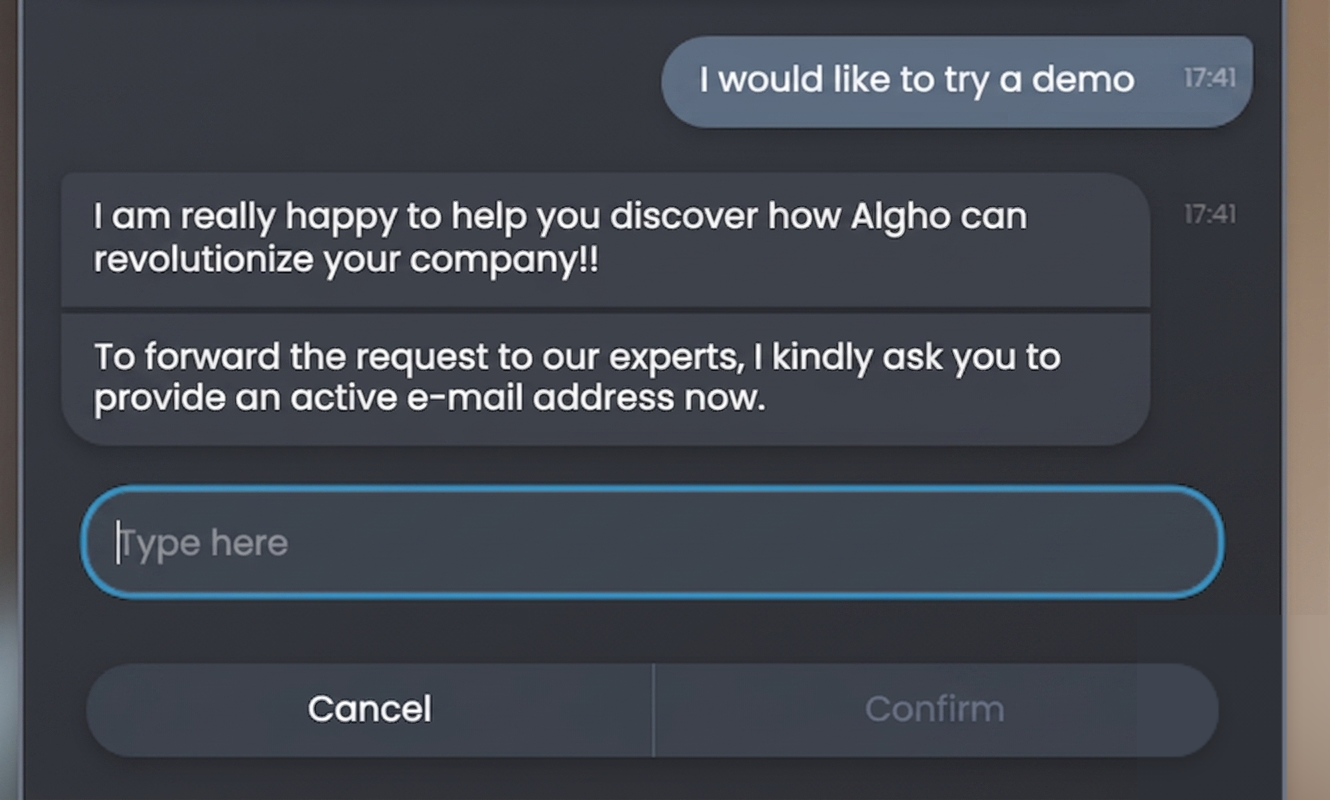
- Disable manual form interruption: whenever the user is inside a form, you can decide whether or not to show the Cancel option, which would let the user interrupt the form at any time.
AI Gen and auto-fill options
- Use AI GEN to reformulate texts: the assistant uses AI Gen to reformulate all the texts of the form. For example, if the question is “Tell me your first and last name”, with this option enabled the assistant might reformulate it as “I need your personal details”.
- Automatic form filling: the assistant extracts from the initial question the information needed to fill in the form fields. If in their initial request a user says “I'm Mario Rossi, I live in Rome and I'd like to book a room” and the form has the First and last name and City fields, the assistant will not ask for this information but will fill it in automatically.
Enabling this option also enables the use of Global Variables.
- Automatic filling after each field: the assistant extracts from the answer to each field information that is also useful for filling in the following fields. To enable this option, Automatic form filling and Use AI Gen to reformulate texts must also be enabled.
- Automatically fill fields already filled in the past: this option saves the user from providing the same data several times when they are in different forms that share some questions. If the user has already provided their tax code in the Room booking form, when they come across the Car rental form they will not be asked for the tax code again.
Knowledge base search
- Search the bot sources if field validation fails: forms are rigid structures that force the user to provide the requested information. Enabling this option makes conversational forms more flexible. If the user answers the form question with another question, the assistant searches the knowledge base for the corresponding intent, answers the user, and then asks the form question again.
Here is an example to make this easier to understand:
- ASSISTANT: Tell me the address where we should deliver the product.
- USER: Do you deliver to the floor?
- ASSISTANT: [searches the knowledge base (see Knowledge Base and Smart Document Access), gives an answer and then asks the form question again].
An essential condition for this option to work is having a configured knowledge base.
Skip and interrupt text
- Text to skip the question: when setting up the fields you can decide which questions to make mandatory. When a question is not mandatory, the Next option appears, in case the user does not want to provide the data.
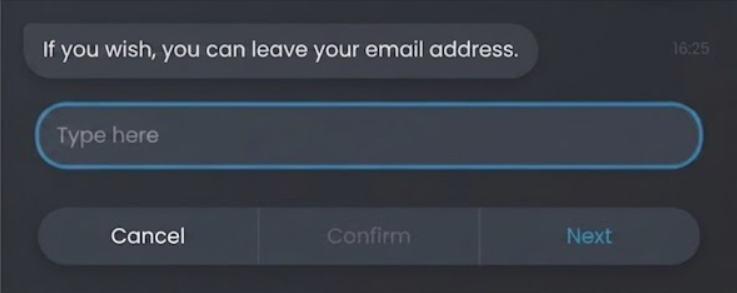
The copy of this option can be customized and aliases can be added, so that reformulations are also recognized. If, instead of typing Next, the user uses the microphone and says “Skip” or “Pass”, the assistant still understands and moves on to the next question.

- Text to interrupt filling: works like the previous one. It concerns the customization of the button that interrupts the filling of the form. You can enter synonyms of Cancel such as “stop”, “enough”, “exit”.
- Form interruption message: if the user interrupts the form, you can write a message that the assistant will say to warn them that the service has not been completed.
Email and web service settings
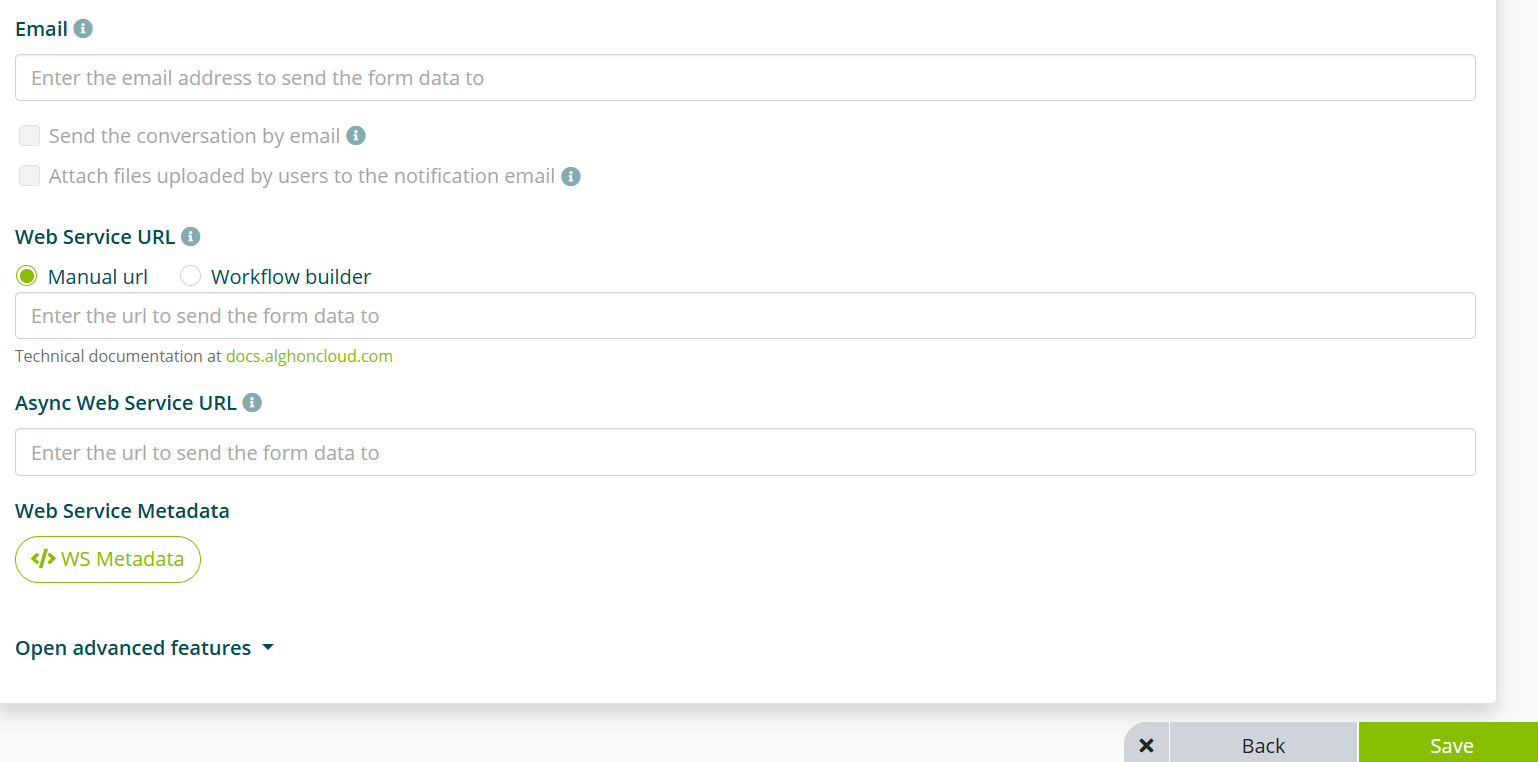
- Email: for the completed answers to reach their destination, an email address must be entered. It can also be a group address containing several addresses. If this field is left empty, the user fills in the form but nobody receives it. It is not mandatory because, in case of direct integration with a company database, the data is transmitted through a web service.
- Send the conversation by email: the whole conversation can also be sent by email, so you can see the entire exchange between user and assistant.
- Attach files uploaded by users to the notification email: if enabled, the files uploaded by users are attached directly to the notification email (up to 20 MB in total).
The following features are purely technical and are used for more advanced integrations that require IT skills.
- Web Service URL: the address of the external service to which Algho sends the data collected while the form is being filled in. When the user answers the questions, the information is saved and sent to this URL in real time.
- Asynchronous Web Service URL: the address of the external service to which Algho sends the form data asynchronously. The submission does not require an immediate response from the external system.
- Web service metadata: JSON passed to the web services configured in the fields and in the form submit.
Command
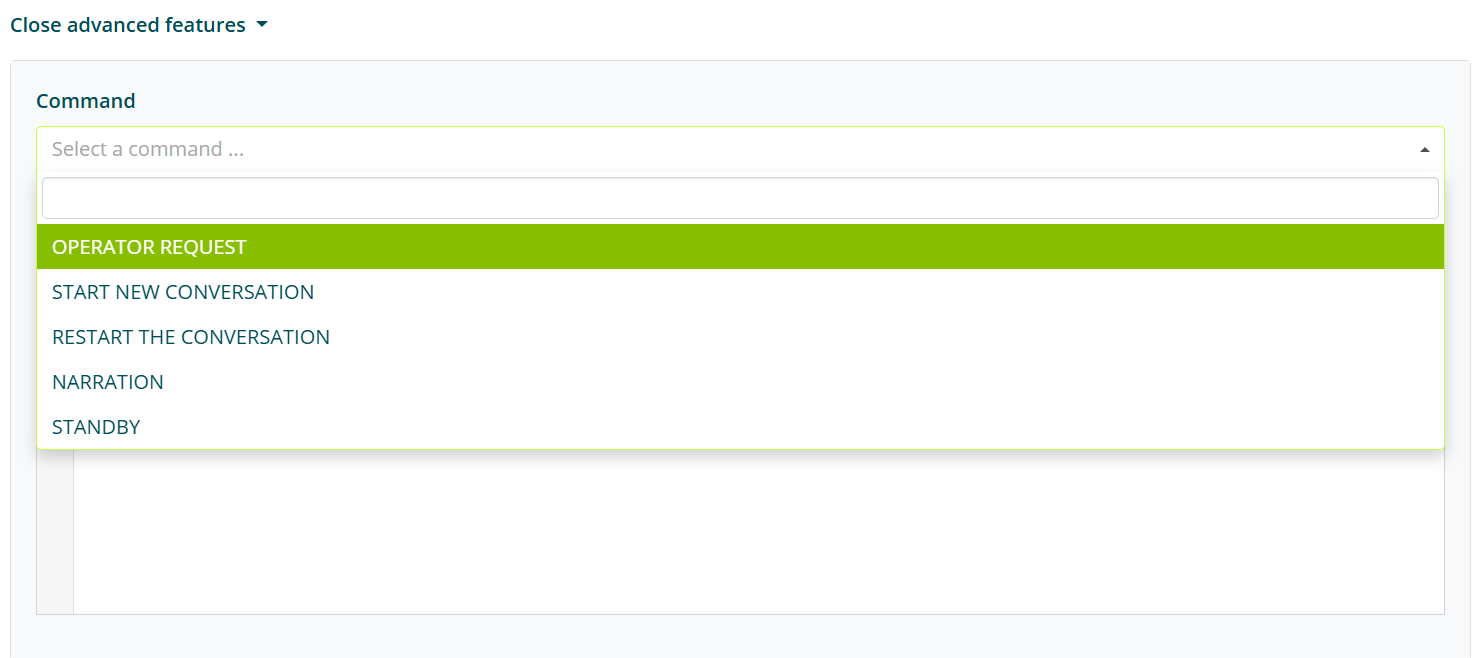
Clicking the Command search bar opens a submenu with the following options:
| Command | Description |
|---|---|
| OPERATOR REQUEST | With this option enabled, right after the form is completed the user is offered to start a Live Chat (see Live Chat). An essential condition is that the user reaches the end of the form by answering all the questions. |
| START NEW CONVERSATION | The conversation starts over. The assistant reloads and starts again from the welcome message. The user is considered new. The conversation history contains two separate conversations. |
| RESTART NEW CONVERSATION | The conversation starts over, but the user ID stays the same. There are still two separate conversations tracked in the history, but with the same ID identifying the same user. |
| STANDBY | After the form is completed the conversation stops, without giving the user the opportunity to talk with the assistant. With VoIP, the call is ended. Useful when the assistant is designed only to collect information, not to provide it. |
Action
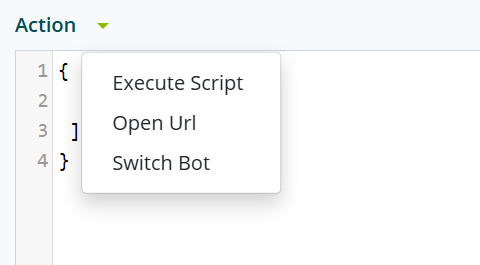
- EXECUTE SCRIPT: runs a custom JavaScript at the end of the form (for browser automation).
- OPEN URL: opens a URL via JSON.
Building Form Fields
Once the general settings are configured, you need to build the set of questions. To access this section, press the Edit fields button at the top right.

You are now in the field editing screen.

Press the Add new field button to start writing the conversational flow.
Field configuration
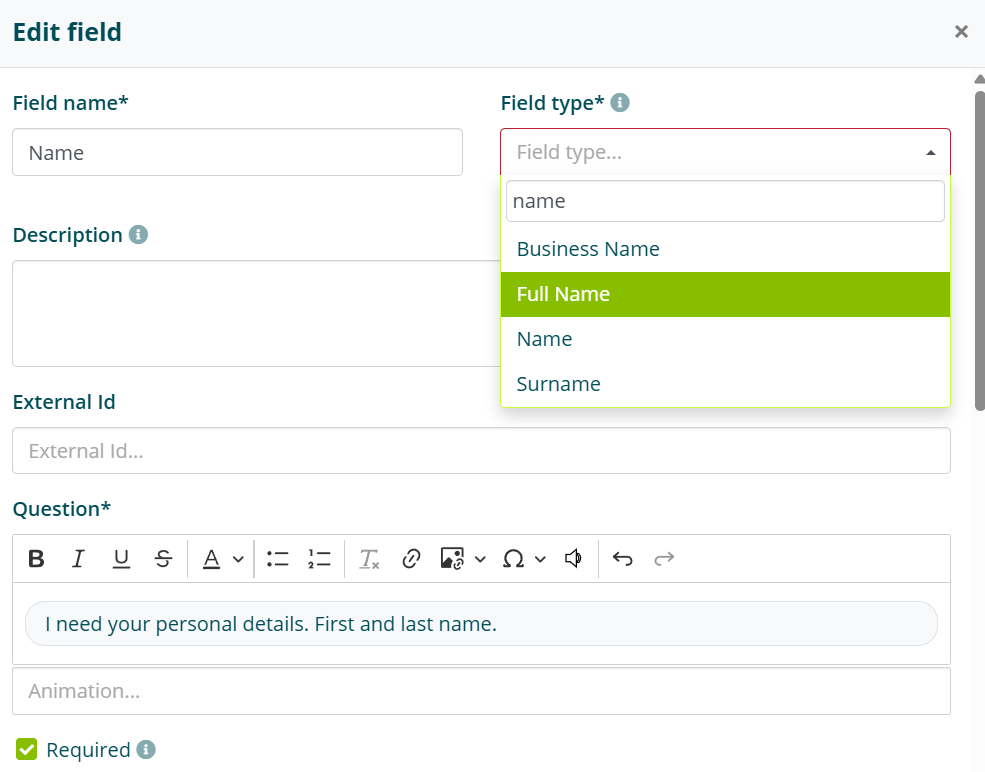
| Field | Description |
|---|---|
| Field name | Identifies the topic of the question. In the summary email, the field names are the data labels next to which the user's answers appear. |
| Field type | The type of check the assistant will perform on the answer. The Full name type expects at least two separate terms. Email requires a valid email format. Phone number expects a certain number of digits. |
| Description | Field for entering the prompt when AI Gen is enabled to validate the field (see AI Gen in Forms). |
| External ID | Optional identifier that links the form field to an external system (CRM, management software, database). For example, if the field is called First and last name in the form, it might be identified as full_name in the external system. |
| Global variable | Global variable (see Global Variables) to associate for automatic filling. Requires the Automatic form filling option to be enabled. |
| Question | The question the assistant will ask. |
| Mandatory field | You can decide whether to make this question mandatory. If it is not mandatory, the Skip option appears, allowing the user not to answer. |
Auto-fill options
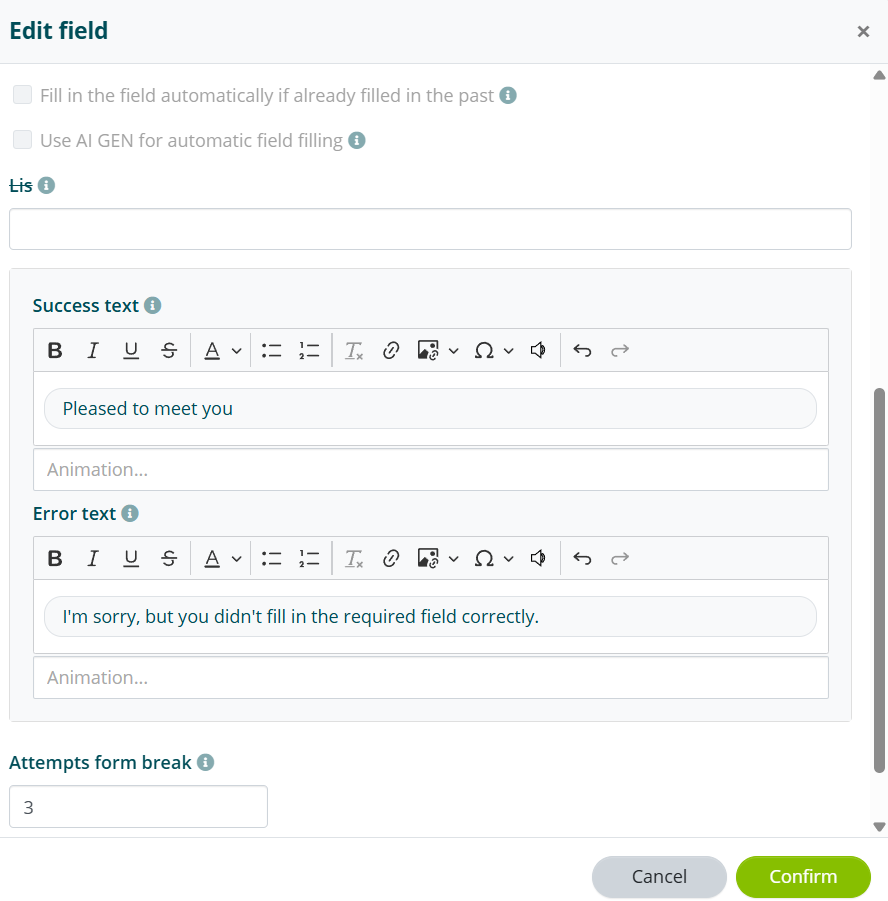
- Automatically fill the field if already filled in the past: avoids repeating this question if the field is already present in another form of the same assistant that the user has already answered.
- Use AI GEN to auto-fill the field: thanks to AI Gen, the assistant extracts from the initial question the information needed to fill in this field (see AI Gen in Forms).
To enable Use AI GEN to auto-fill the field, you must enter the prompt in the Prompt for automatic form filling with AI GEN section of the general form settings.
Messages and attempts
| Field | Description |
|---|---|
| Success text | Text the assistant will say right after the user has answered the question. It is not mandatory. |
| Error text | If the user's answer is not validated, an error message is triggered. If none is entered, a default one is shown. |
| Form interruption attempts | After a number of attempts, if the answer is not validated correctly the form stops and the failure message is triggered. The default number of attempts is 3 (you can set a value from 0 to 99). |
Advanced field functions
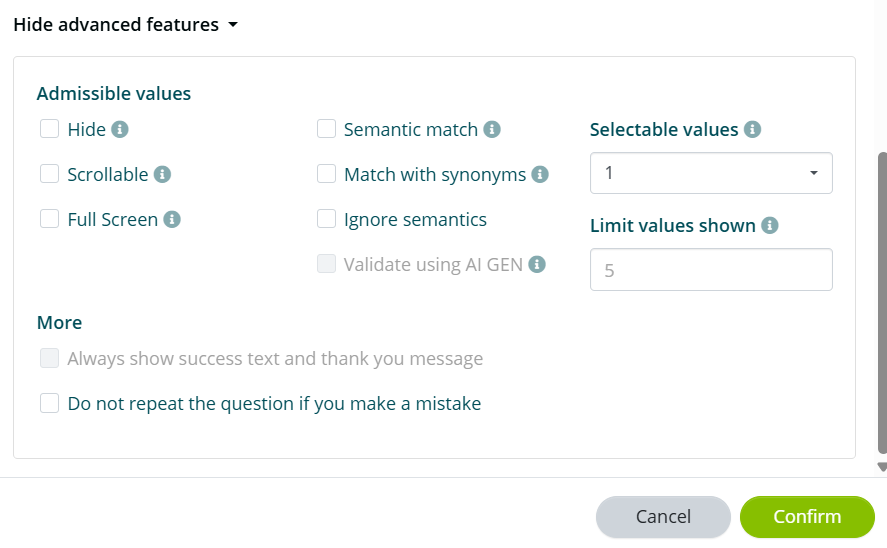
Advanced functions mainly concern the management of admissible values (see Form Admissible Values).
Admissible values display modes:
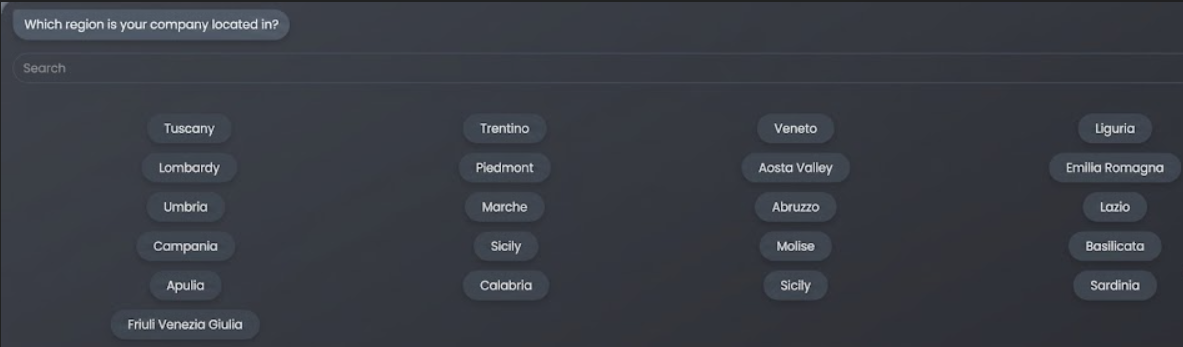
- HIDE: the admissible values are present but not visible to the user. Useful when there are many of them and the user's answer must match one of them. Example: “Which Italian region are you calling from?”.
- SCROLLABLE: if there are many admissible values, instead of showing them full screen you can make them visible one at a time by scrolling.

- FULL SCREEN: the assistant shows a default number of values. If there are many, you can choose to “expand” them, showing them all full screen.
Matching options:
| Option | Description |
|---|---|
| SEMANTIC MATCH | If the user uses the microphone or is on the VoIP channel, pronunciation may not be precise. With this function enabled, Algho matches the pronunciation to the actual written value. |
| MATCH WITH SYNONYMS | If the user uses a different term, the assistant looks for the similar term among the synonyms. Example: admissible value “CEO” and the user says “Head”. If “Head” is entered as a synonym, the answer is validated. |
| IGNORE SEMANTICS | Closely related to semantic match. It tells the assistant not to catch pronunciation variations. The admissible value must be spoken or written exactly as entered. |
Other advanced options:
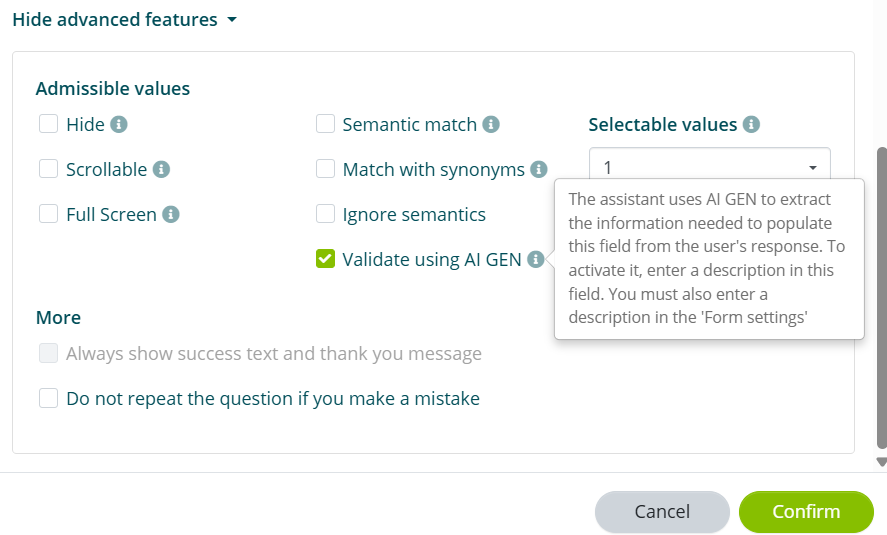
- VALIDATE USING AI GEN: extracts from the user's answer the valid information for filling in the field. It replaces the matching options described above (see AI Gen in Forms).
- SELECTABLE VALUES: sets how many admissible values the user can select (multiple answer).
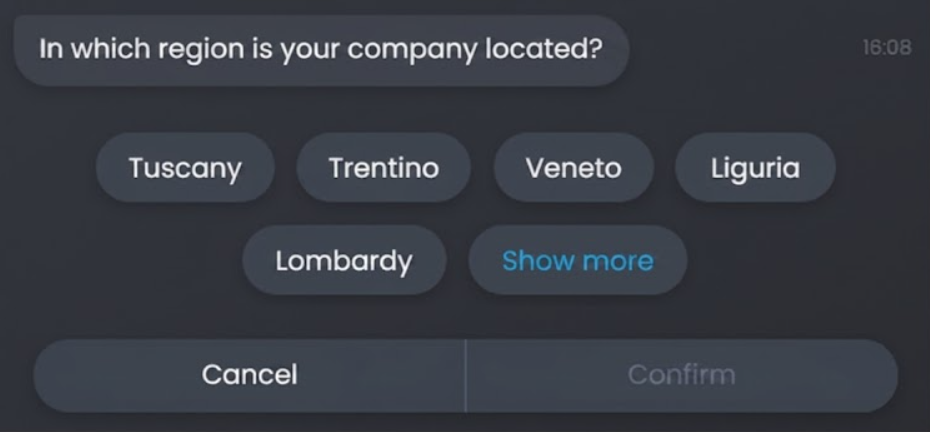
- LIMIT SHOWN VALUES: sets how many admissible values to show. If only some are shown, the Show more button appears.
- ALWAYS SHOW THE SUCCESS TEXT AND THE THANK YOU MESSAGE: when some fields are filled in automatically, any thank you and success messages would not be said. With this option they are always shown.
- DO NOT REPEAT THE QUESTION IN CASE OF ERROR: you can decide whether the assistant should repeat the question after an error. The best approach is to write an error message that explains to the user how to provide the data, without needing to repeat the question.
Summary screen
Once the settings are confirmed, the summary screen is displayed:
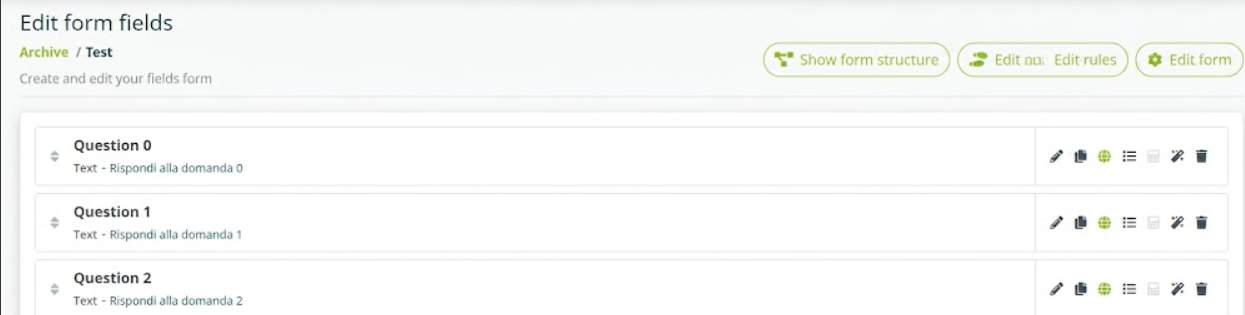
This screen shows:
- Field name (e.g. “Region”).
- Associated question (e.g. “In which region is your company located?”) with the field type.
- Red asterisk: mandatory field.
- Number of admissible values entered (e.g. “21”).
The available options are listed below, in order:
| Action | Description |
|---|---|
| Edit | Edit the field settings. |
| Duplicate | Duplicate the created field. |
| Web Service | Connect an external system of admissible values via API. |
| Admissible values | Enter multiple options for the user to choose from. |
| Regex | Regular expression for checking that the answer follows a precise format. |
| Delete | Delete the field. |
Form Admissible Values
Admissible values must be entered when a form question expects a multiple-choice answer.
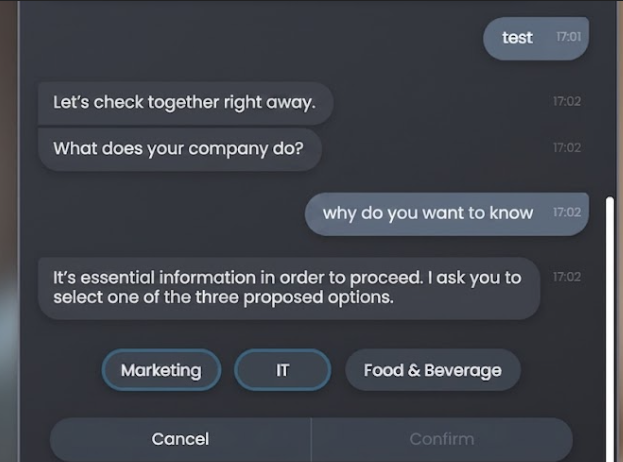
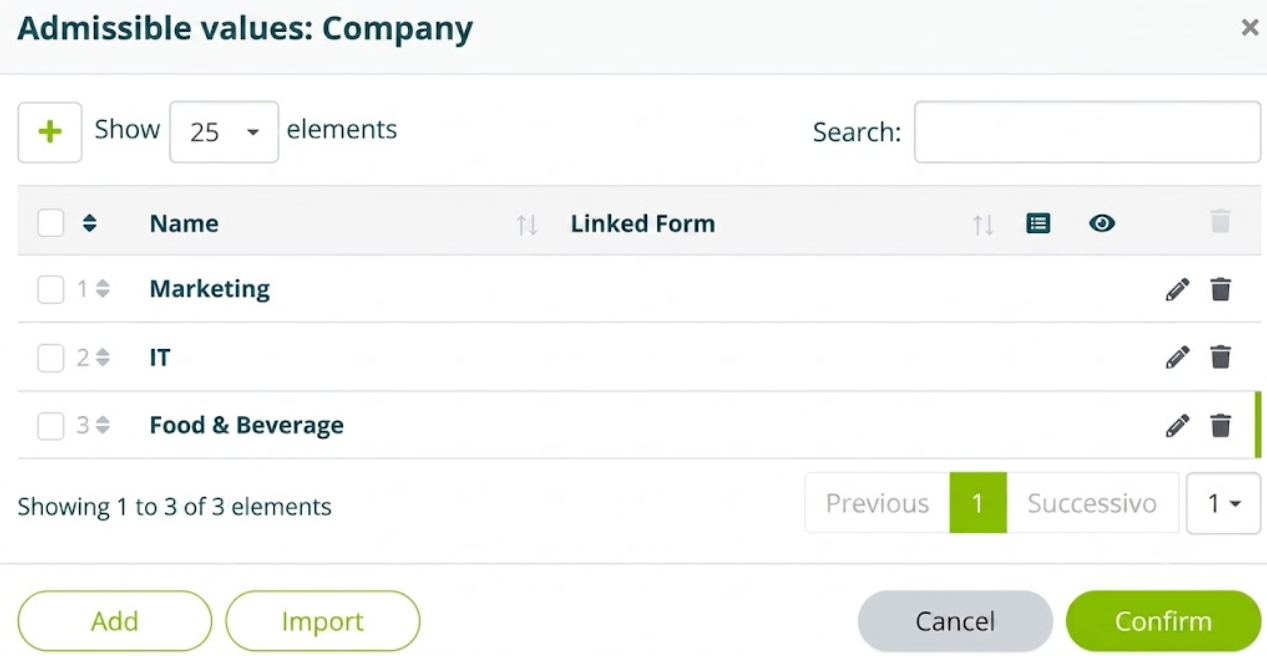
Here is an example: a question such as “Which sector does your company operate in?” with the alternatives Marketing, IT, Food & Beverage for the user to choose from.
How to enter admissible values
First you need to build the field (see Building Form Fields). Once the question is confirmed, you are on the summary screen:

To enter admissible values, click the Admissible values icon.
The following screen opens:
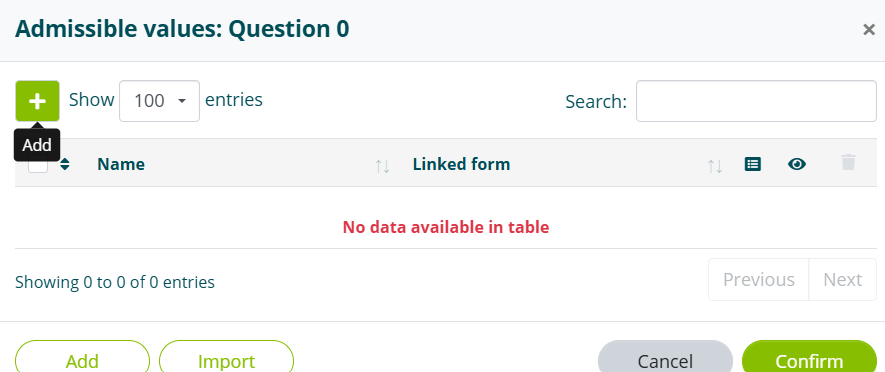
Press the Add button to add admissible values.
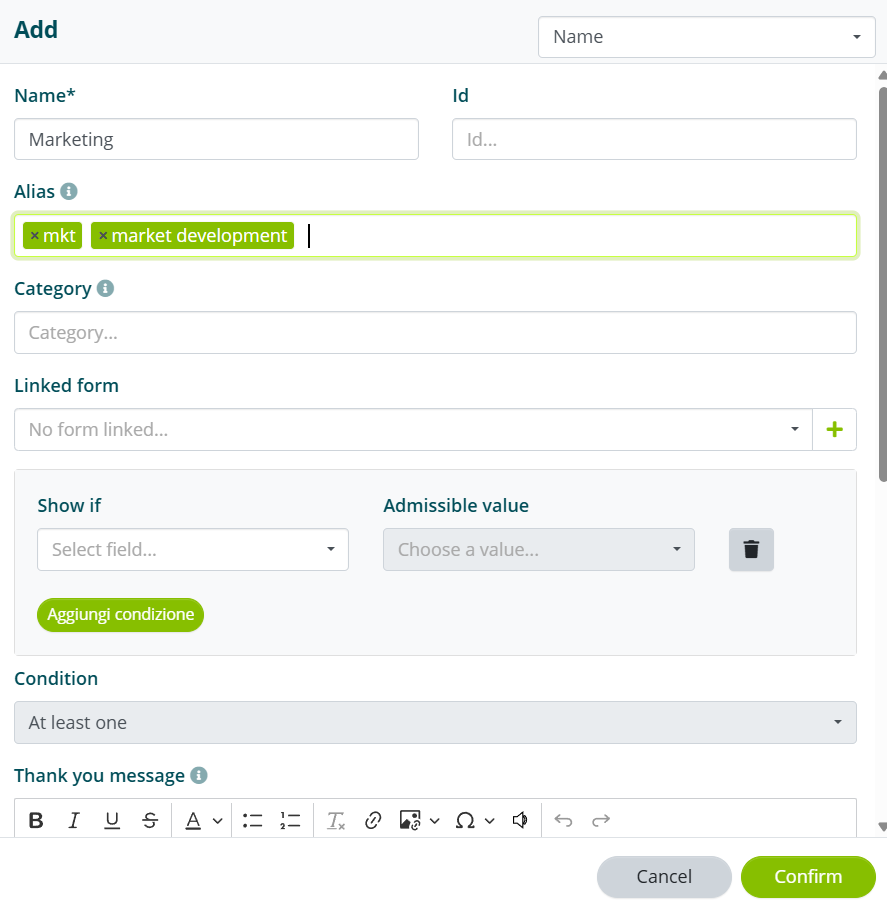
- Name: the admissible value, exactly as you want it to appear on screen.
- Alias: you can enter aliases so that, if the user writes a different but related term, the assistant still recognizes it.
Difference between semantic match and alias
- Semantic match catches semantic variations of the admissible value (e.g. pronunciation variations).
- Aliases catch synonyms of the admissible value (which semantic match would not be able to do).
The main difference is that with aliases the algorithm validates the admissible value only if there is an exact and perfect match between what the user says or writes and the alias entered. If the user said “business development” and that alias is not present, the answer would not be validated.
Once all the admissible values are entered, save to get the summary screen:
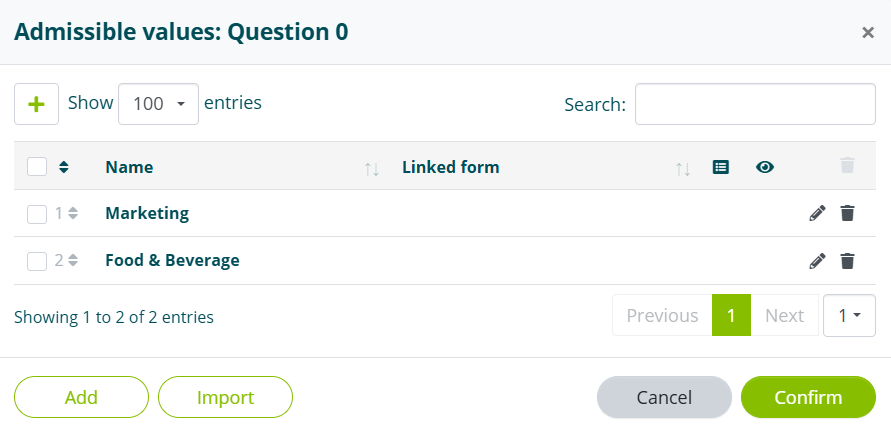
Press Confirm. The completed field appears with the admissible values icon highlighted in green, indicating that choice options are present.

Setting Triggers for a Form
Once created, the form is not activated automatically. It must be “linked” to the concept it is closely connected to.
There are two ways to create this link.
Via the Knowledge Base
If the assistant uses a knowledge base, the form must be linked to the intent.
Open the knowledge base and edit the intent.

Once inside the intent, scroll down to the Select which form to link option:
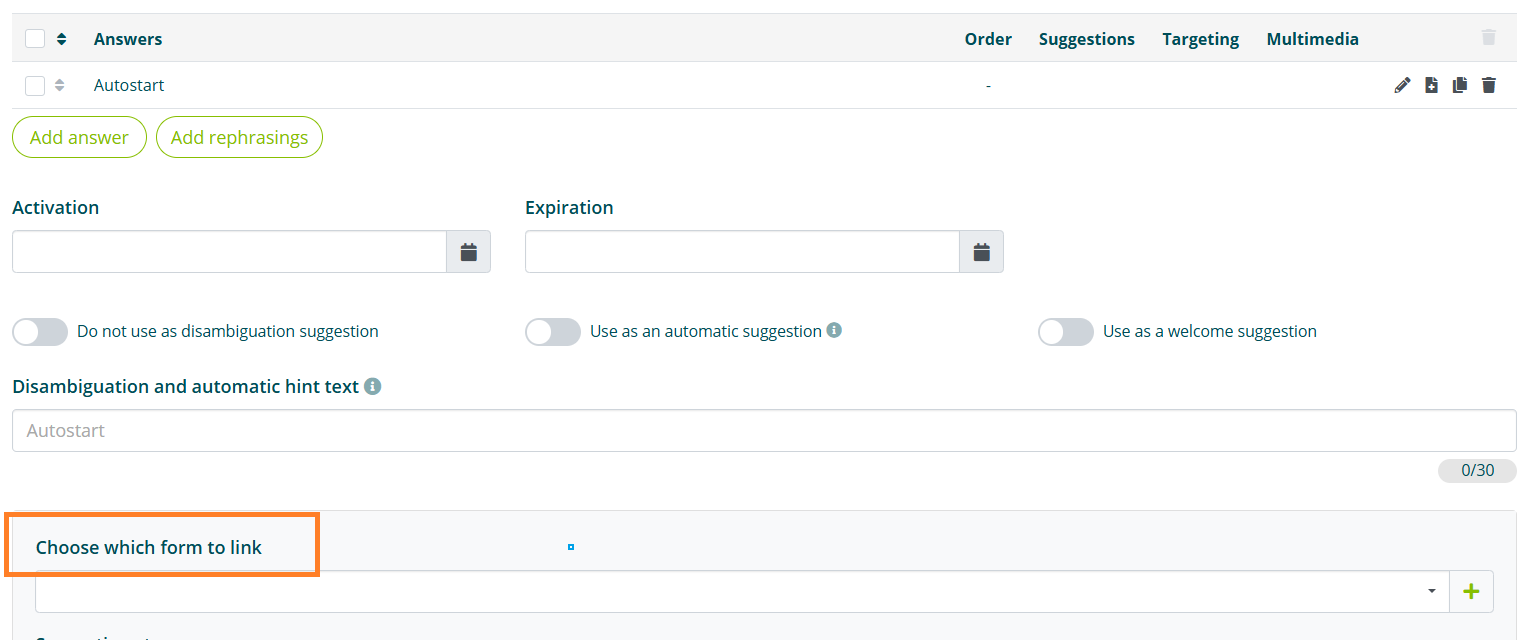
Click the arrow on the far right and select the form to attach:

Save. A green speech bubble appears next to the intent, indicating that the form has been linked:
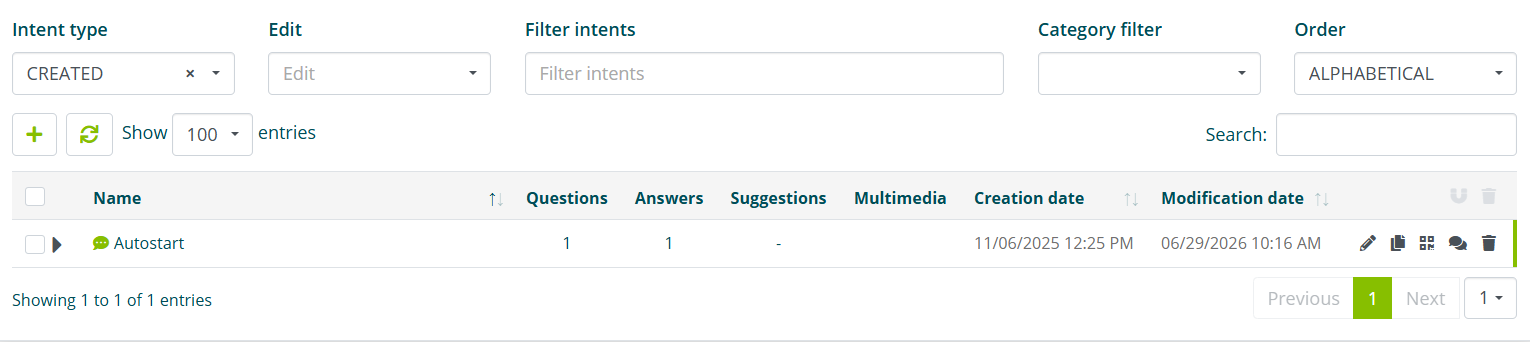
Clicking the speech bubble takes you directly into the form.
Via SDA or AI Gen
The second way to start a form is through a prompt, using AI Gen. In this case the form is not linked to an intent, going beyond the logic of intents and the static KB.
See Connecting an assistant to the documentation and AI Gen for the Knowledge Base for more information.
AI Gen in Forms
Enabling AI Gen on forms acts on two elements of communication, both written and spoken: the user's question and the user's answer. AI Gen integration is used to catch complex grammatical and semantic structures and to make the interaction smoother and more dynamic.
AI Gen can be used for two levels of analysis:
- First-level AI Gen analyzes the user's question, extracting the information for filling in the form fields.
- Second-level AI Gen analyzes only the answers the user gives to the individual form questions.
The two levels can be active at the same time.
First level: analysis of the user's question
AI Gen acts on the user's question. The algorithm extracts information from the initial question to fill in the form fields automatically, avoiding asking for information the user has already given.
Take as an example a form for a preliminary interview.
The form has the following fields:
Field 1. Give me your details. First and last name.
Field 2. Give me a valid email address so we can contact you.
Field 3. How many languages do you speak?
If in their initial question the user expresses a structured request such as:
USER: Hello, I'm Mario Rossi, I'd like to have a job interview with you. I speak two languages fluently: Italian and English.
Algho extracts the information for fields 1 and 3 and only asks:
ASSISTANT: Give me a valid email address so we can contact you.
Second level: analysis of the user's answer
AI Gen acts on the user's answer, helping the assistant better understand the information received and validate it.
Assuming an interaction like this:
ASSISTANT: How many languages do you speak? Please also state your level for each one.
USER: I speak English and French
The prompt entered and the Validate using AI GEN option help the assistant understand that the answer must not be validated, because the candidate has not specified their level.
How to enable AI Gen on forms
First create the form and define its title and language, then enter the first prompt:
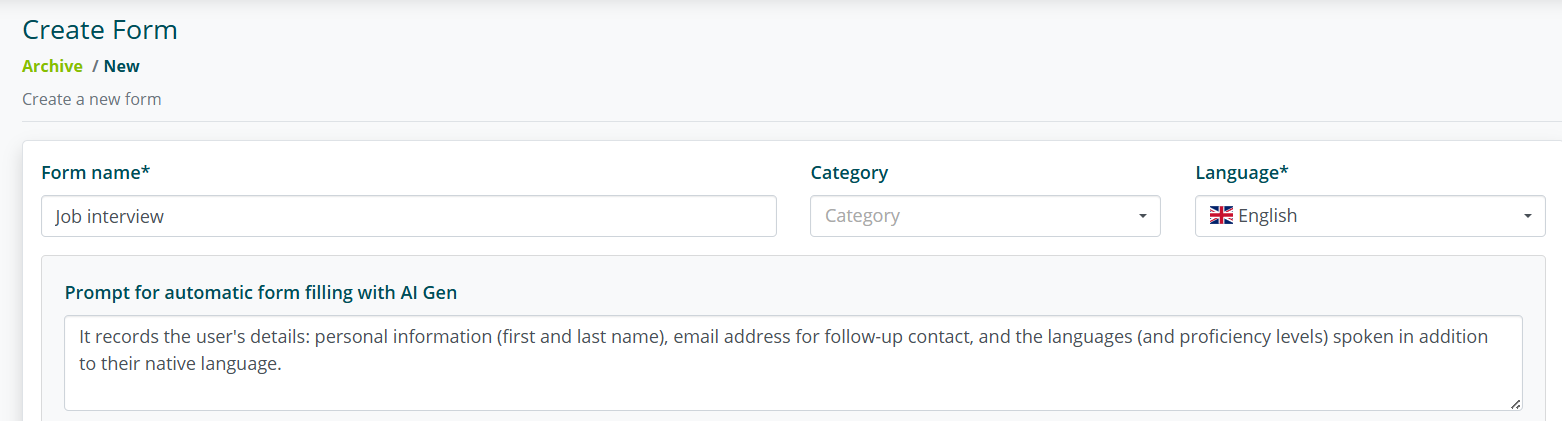
This prompt must be very generic. It gives the assistant a preliminary instruction.
This prompt is required for both levels of analysis.
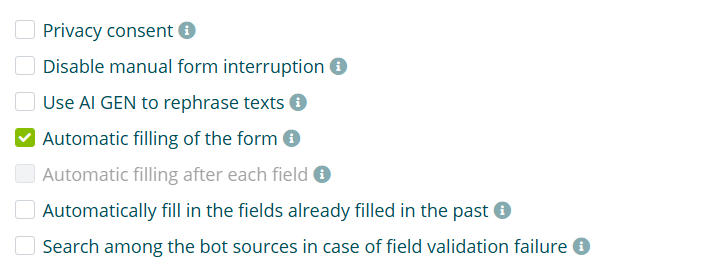
For 1st level analysis, enable the Automatic form filling option.
This option is not required if you only want to enable 2nd level analysis.
Build the form fields with the following structure:
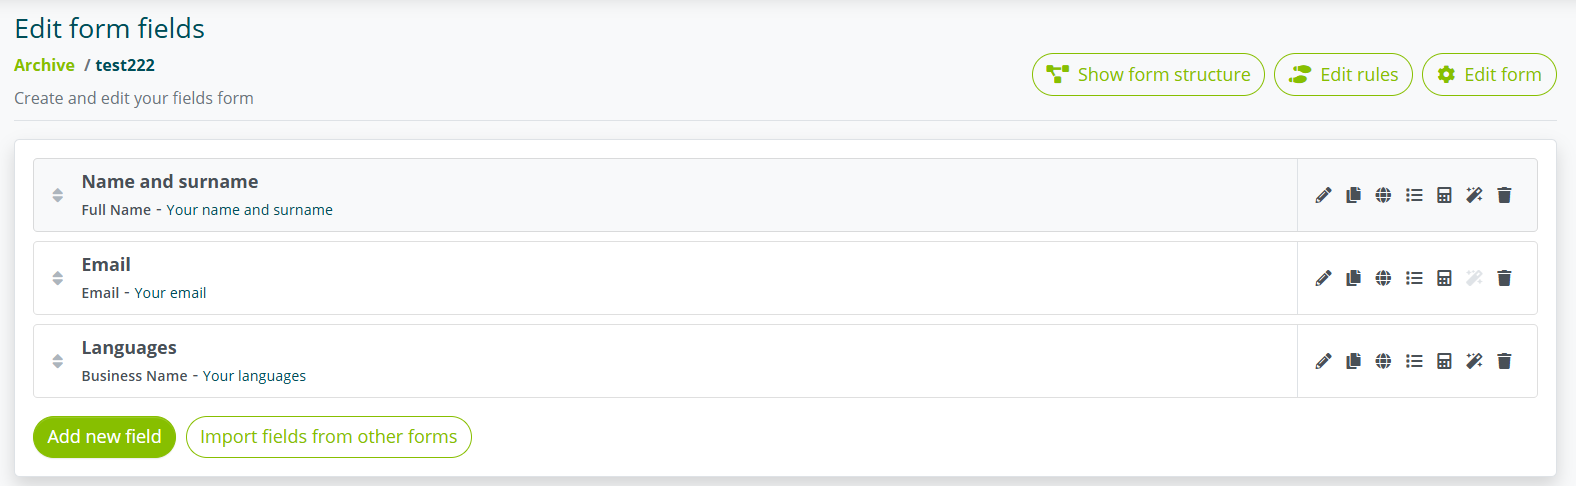
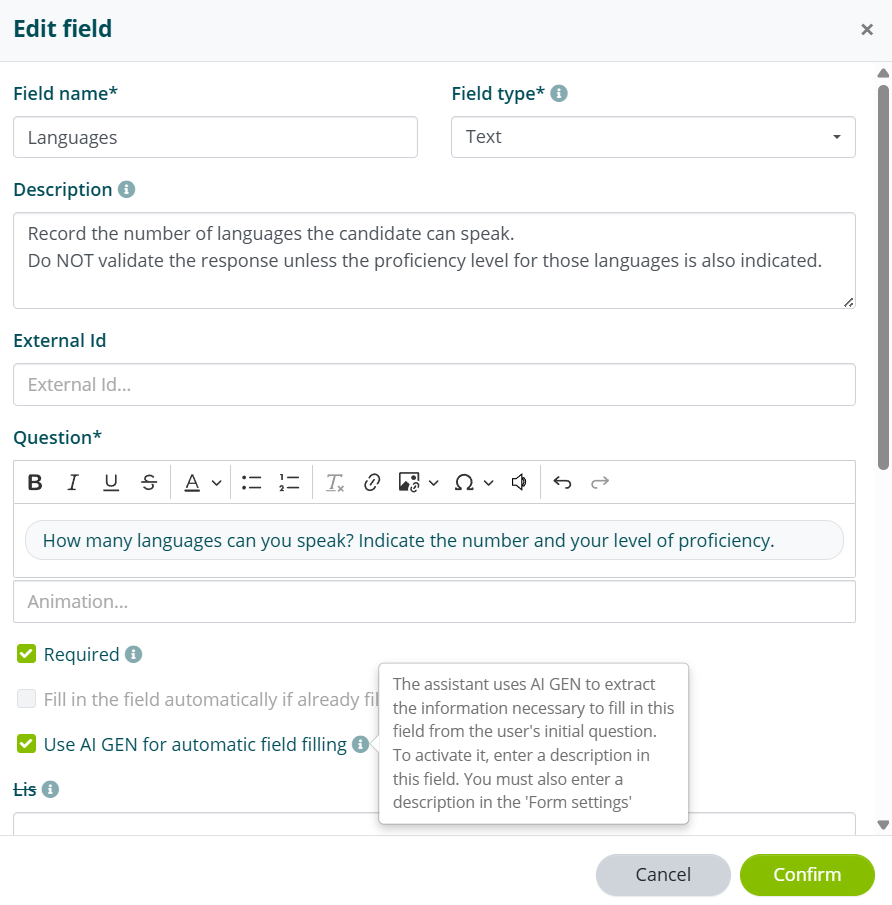
In the Description field, enter a second prompt, specific to the question created. It tells AI Gen when to validate the answer and when not to. Depending on the active level of analysis, if validation fails:
- 1st level: the question is asked.
- 2nd level: the error message is triggered and the question is asked again.
Enable the Use AI GEN to auto-fill the field option for 1st level analysis.
Enable Validate using AI Gen under Advanced functions for 2nd level analysis.
Nested Forms
Forms should be thought of as flowcharts where, depending on the answers given by the user, the communication can vary and take different paths.
Here is an example: a form for profiling a company. The first question is the sector the company operates in and, depending on the sector, you want to ask dedicated questions, creating a specific flow. You can do this with nested forms.
Parent form
This is the starting form (called the “parent”):
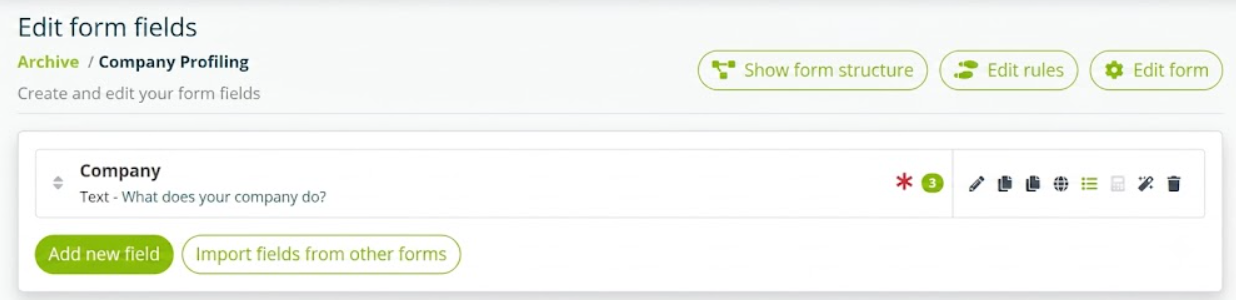
With the following admissible values:
Creating a nested form
Create another form from scratch, for example Nested Food and Beverage, with the questions specific to that sector:
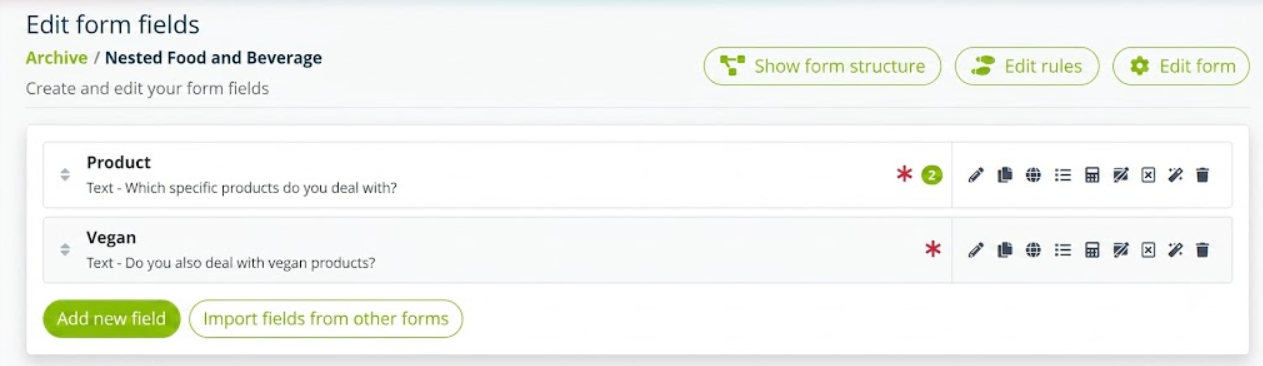
Nesting the form in the admissible value
Go back to the parent form, open the Food & Beverage admissible value and nest the form you created:
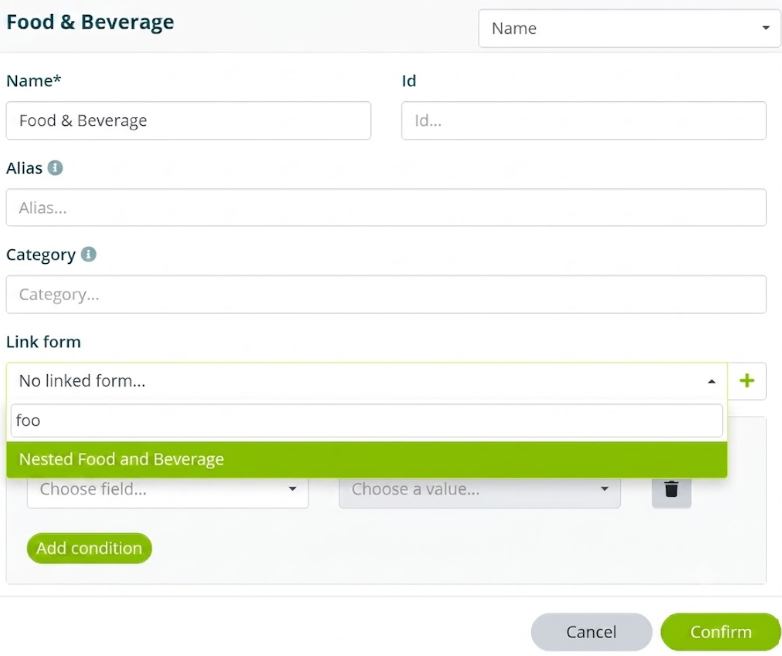
The same operation can be repeated for all the other admissible values.
Viewing the structure
To view the final structure of the form, open the parent form and click the Show form structure button:

A summary screen with the whole structure opens:
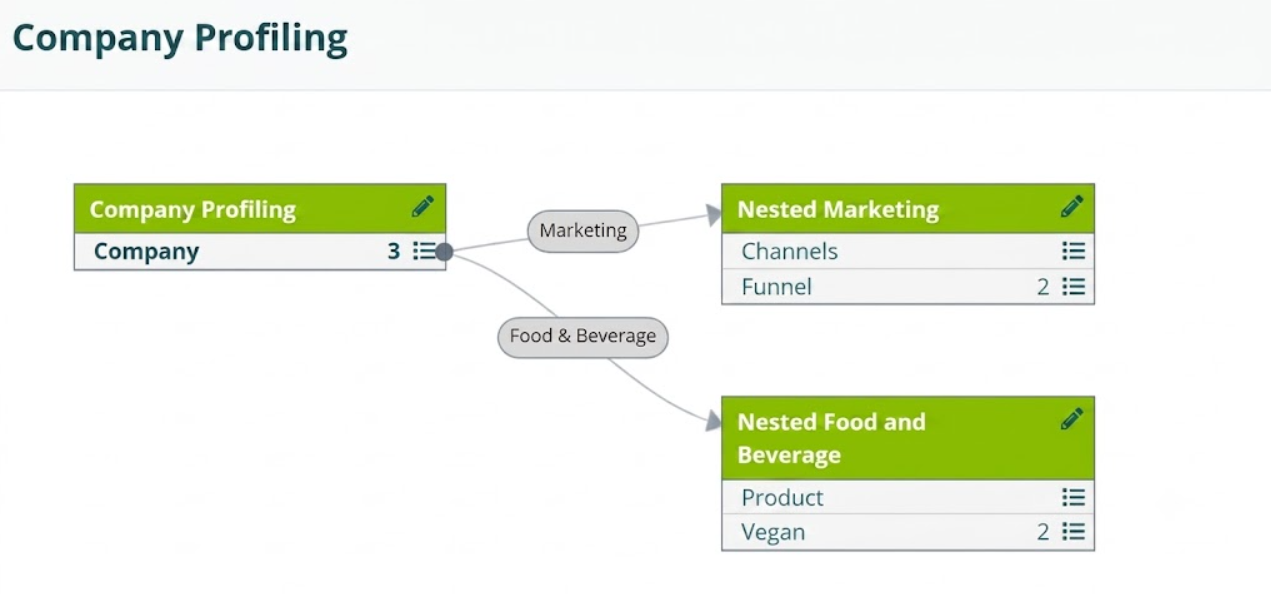
Clicking the pencils lets you open each form and make changes.
Flow behavior
At the end of each form, regardless of the number of nested forms, the flow always returns to the parent form.
This means that if you add a thank you message in the parent form and another thank you message in the nested form, the assistant will say both. The same applies to fields: if you add fields to the parent form, at the end of the nested forms the flow returns to the initial form and also asks the added questions.
Rules
Rules let you define what should happen when the form ends, for example whether to start another form or call an intent, based on how the form itself was filled in (or not filled in).
Rules are accessible from the form archive, by selecting the corresponding option, or from the form editor, by selecting the corresponding option at the top.


Creating a rule involves different parameters depending on the type of link.
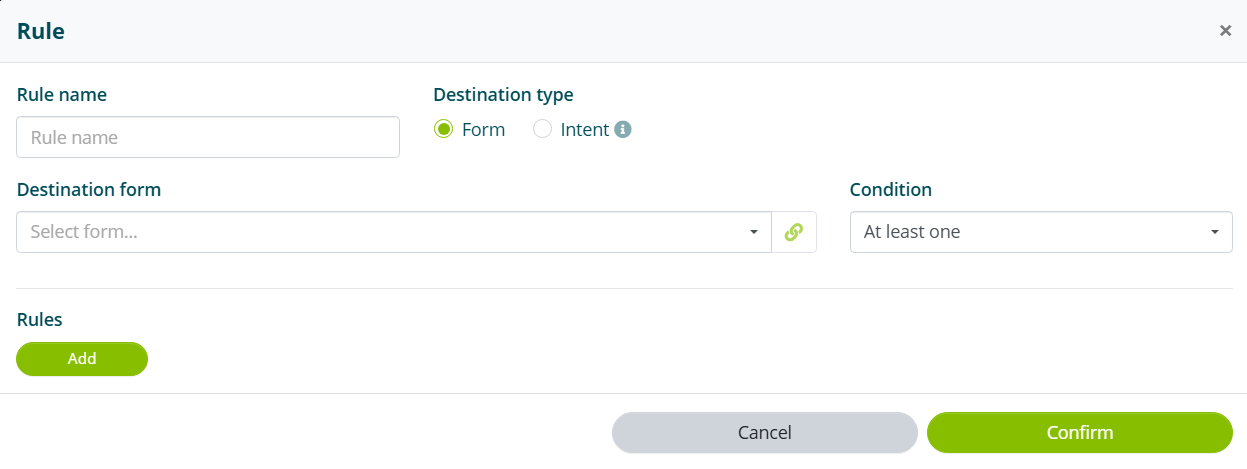
If the link is another form, you must indicate the form to start.
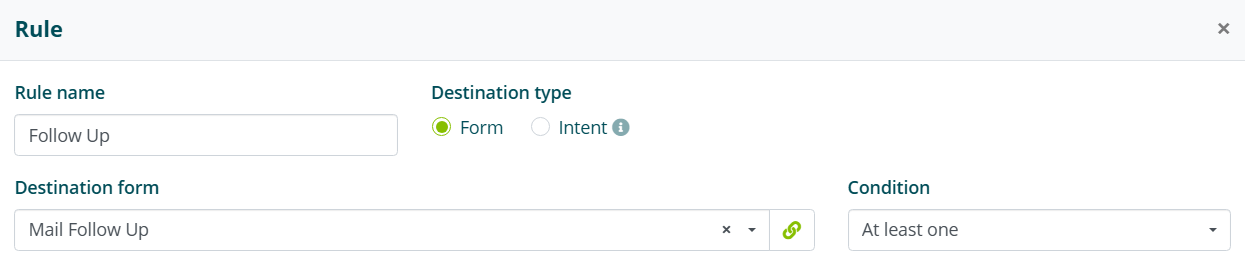
If the link is an intent, you must indicate the assistant the intent belongs to and the intent itself.
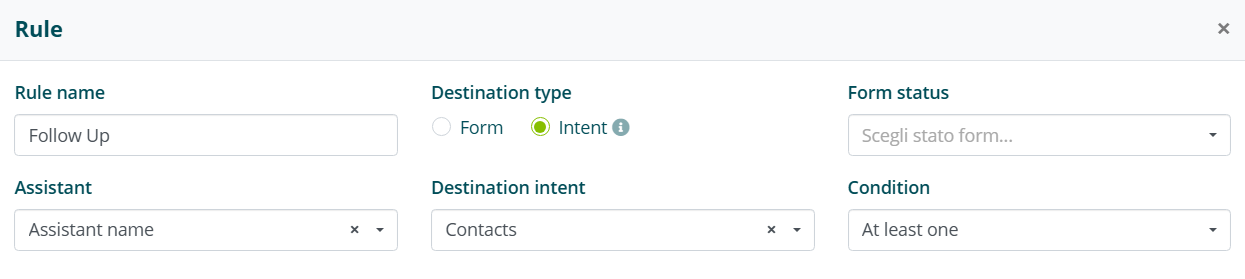
If the link is an intent, it will be started if and only if:
- the form was started by the assistant indicated in the rule.
- the rule indicates the assistant that owns this intent.
If you use a rule to link an intent that in turn has a form linked to it, the form will not be started.
For both types of link you can set the conditions under which the rule is valid.

A condition corresponds to how the user filled in a given field of the form.
If the field has admissible values, these can be selected in the condition.
You can also set whether the conditions must all be valid at the same time (All) or whether it is enough for one condition to be valid (At least one).

If no condition is set, the rule will be valid every time the form is filled in.